説明
WebGLのラッパーライブラリであるThree.jsを用いて、メタボールという表現を作っていきます。
※Three.jsやGLSL(シェーダー)等、前提として必要になる知識が多いため、Three.jsやGLSLの基礎について学んだあとでデモの作成をすることをお勧めします。
使用するライブラリ
Three.js
Github:https://github.com/mrdoob/three.js/
公式サイト:https://threejs.org/
手順
手順1
GitHubからライブラリをダウンロードし、</body>タグの直前でbuild/配下にあるthree.min.jsを読み込みます。
コード
<script src=“js/three.min.js”></script>
npmからインストールしてくる場合は、以下のコマンドをターミナルで実行してください。
コマンド(npm)
npm i three
手順2
まず最初にHTMLです。HTMLは至ってシンプルで、以下の1行をHTMLに記述するだけです。
このcanvasタグの中に、今回Three.jsで作成したものを表示します。CSSは特に必要ありません。
<canvas id="webgl-canvas"></canvas>
手順3
次にJavaScriptです。JavaScriptではそれぞれ役割別に、StageとMeshという2つのクラスを作成します。まず最初にStageクラスです。このStageクラスでは、WebGLをレンダリングするためのレンダラーや3Dオブジェクトを表示するためのシーン、3D空間を見る視点になるカメラ等を作成していきます。
class Stage {
  constructor() {
    this.renderParam = {
      width: window.innerWidth,
      height: window.innerHeight
    };

    this.cameraParam = {
      fov: 60,
      near: 0.1,
      far: 10.0,
      lookAt: new THREE.Vector3(0, 0, 0),
      x: 0,
      y: 0,
      z: 1.0
    };

    this.scene = null;
    this.camera = null;
    this.renderer = null;
    this.isInitialized = false;
  }

  // 初期化
  init() {
    this._setScene();
    this._setRender();
    this._setCamera();

    this.isInitialized = true;
  }

  // シーンの作成
  _setScene() {
    this.scene = new THREE.Scene();
  }

  // レンダラーの作成
  _setRender() {
    this.renderer = new THREE.WebGLRenderer({
      canvas: document.getElementById('webgl-canvas')
    });
    this.renderer.setPixelRatio(window.devicePixelRatio);
    this.renderer.setSize(this.renderParam.width, this.renderParam.height);
  }

  // カメラの作成
  _setCamera() {
    const windowWidth = window.innerWidth;
    const windowHeight = window.innerHeight;

    if (!this.isInitialized) {
      this.camera = new THREE.PerspectiveCamera(
        this.cameraParam.fov,
        windowWidth / windowHeight,
        this.cameraParam.near,
        this.cameraParam.far
      );

      this.camera.position.set(
        this.cameraParam.x,
        this.cameraParam.y,
        this.cameraParam.z
      );
      this.camera.lookAt(this.cameraParam.lookAt);
    }

    this.camera.aspect = windowWidth / windowHeight;
    this.camera.fov =
      THREE.MathUtils.radToDeg(
        Math.atan(
          windowWidth / this.camera.aspect / (2 * this.camera.position.z)
        )
      ) * 2;

    this.camera.updateProjectionMatrix();
    this.renderer.setSize(windowWidth, windowHeight);
  }

  // レンダリング
  _render() {
    this.renderer.render(this.scene, this.camera);
  }

  // リサイズイベント
  onResize() {
    this._setCamera();
  }

  // requestAnimationFrame
  onRaf() {
    this._render();
  }
}
手順4
続いてMeshクラスです。このMeshクラスでは、ジオメトリ(形状)とマテリアル(表面の質感)からメッシュを作成します。マテリアルについてはThree.jsで事前に用意されているものを使用せず、ShaderMaterialというものを使ってこの後説明するシェーダー(GLSL)で表現していきます。また、Stageクラス同様にレンダリング、リサイズイベント、アニメーションと、マウスの動きに連動してメタボールが動くようにするために、マウスイベントの処理も記述しています。
class Mesh {
  constructor(stage) {
    this.uniforms = {
      u_time: { type: "f", value: 1.0 },
      u_mouse: { type: "v2", value: { x: 0, y: 0 } },
      u_resolution: { type: "v2", value: [ window.innerWidth, window.innerHeight ] }
    };

    this.stage = stage;
    this.mesh = null;
  }

  // 初期化
  init() {
    this._setMesh();
    this.onResize();
  }

  // メッシュの作成
  _setMesh() {
    const geometry = new THREE.PlaneBufferGeometry(2, 2);
    const material = new THREE.ShaderMaterial({
      vertexShader: document.getElementById("js-vertex-shader").textContent,
      fragmentShader: document.getElementById("js-fragment-shader").textContent,
      uniforms: this.uniforms,
      blending: THREE.AdditiveBlending
  });

    this.mesh = new THREE.Mesh(geometry, material);
    this.stage.scene.add(this.mesh);
  }

  // レンダリング
  _render() {
    this.uniforms.u_time.value += 0.01;
  }

  // マウスイベント
  onMouseMove(evt) {
    let x = evt.clientX / 2;
    let y = evt.clientY / 2;
    const width = window.innerWidth;
    const height = window.innerHeight;
    this.uniforms.u_mouse.value.x = (x - width / 2.0) / (width / 2.0);
    this.uniforms.u_mouse.value.y = -((y - height / 2.0) / (height / 2.0));
  }

  // リサイズイベント
  onResize() {
    this.uniforms.u_resolution.value.x = window.innerWidth;
    this.uniforms.u_resolution.value.y = window.innerHeight;
  }

  // requestAnimationFrame
  onRaf() {
    this._render();
  }
}
手順5
最後にシェーダー(GLSL)です。今回はHTML上にスクリプトタグを用いてシェーダーを記述し、それの中身をJavaScript側から読み込んであげるようにします。シェーダは頂点シェーダー(vertexShader)とフラグメントシェーダー(fragmentShader)という2種類のシェーダーがありますが、今回主に使用しているのはフラグメントシェーダーの方になります。
<!-- vertexShader -->
<script id="js-vertex-shader" type="x-shader/x-vertex">
  varying vec2 vUv;

  void main()	{
    vUv = uv;
    gl_Position = vec4(position, 1.0);
  }
</script>

<!-- fragmentShader -->
<script id="js-fragment-shader" type="x-shader/x-fragment">
  precision highp float;

  uniform float u_time;
  uniform vec2 u_mouse;
  uniform vec2 u_resolution;

  varying vec2 vUv;

	vec2 random2( vec2 p ) {
    return fract(sin(vec2(dot(p,vec2(127.1,311.7)),dot(p,vec2(269.5,183.3))))*43758.5453);
  }

  void main() {
    vec2 st = gl_FragCoord.xy/u_resolution.xy;
    st.x *= u_resolution.x/u_resolution.y;

    // メタボールのスケール。この値を大きくするとメタボールが小さく、かつ数が増える。
    st *= 2.0;

     // 空間にタイルを敷く。
     vec2 i_st = floor(st);
    vec2 f_st = fract(st);

     // 最短距離。この値を大きくするとメタボール同士の間隔が広くなる。
    float m_dist = 1.0;

    for (int j= -1; j <= 1; j++ ) {
      for (int i= -1; i <= 1; i++ ) {
        // グリッド内の隣接する場所。
        vec2 neighbor = vec2(float(i),float(j));

        // グリッド内の現在地+隣接する場所からのランダムな位置。
           // これからu_mouseの値を引くことで、メタボールの位置にマウスの動きで干渉できるようになる。
        vec2 offset = random2(i_st + neighbor) - u_mouse;

        // オフセットをアニメーションする。
        offset = 0.5 + 0.5 * sin(u_time + 8.321 * offset);

        // セルの位置。
        vec2 pos = neighbor + offset - f_st;

        // セルの距離。
        float dist = length(pos);

        // メタボールを出力する。
        m_dist = min(m_dist, m_dist * dist);
      }
    }

    // セルを描画する。
    float result = step(0.090, m_dist);
     // 背景orメタボールの色
    vec3 outputColor = vec3(0.0);
     // メタボールの色
    vec3 blobColor = vec3(0.6, 0.4, 1.0);

     // もし、result(セルの描画結果)が1.0なら...
    if (result == 1.0)
        // outputColorには背景色を入れる。
      outputColor =  vec3(0.2, 0.2, 0.2);
    else
        // outputColorにはblobColor(メタボールの色)を入れる。
      outputColor = blobColor;
     // outputColorを出力する。
    gl_FragColor = vec4(outputColor, 1.0);
  }
</script>
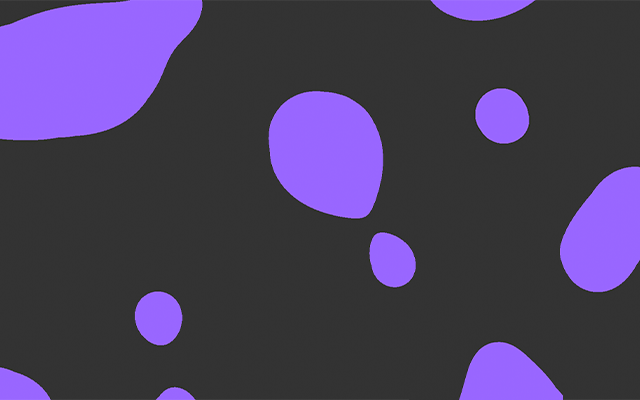
サンプル
Three.jsを使ったメタボールのサンプルです。常に一定のスピードで動くようになっているのに加え、メタボール上でマウスを動かしてあげるとマウスの動きに連動してメタボールが動くようにもなっています。