説明
WebGLのラッパーライブラリであるThree.jsを用いて、モーフィングという表現を作っていきます。
使用するライブラリ
- Three.js
Github:https://github.com/mrdoob/three.js/
公式サイト:https://threejs.org/
- GSAP
Github:https://github.com/greensock/GSAP
公式サイト:https://greensock.com/gsap/
手順
手順1
Three.js
GitHubからライブラリをダウンロードし、</body>タグの直前でbuild/配下にあるthree.min.jsを読み込みます。
GSAP
公式にあるこちらのページからZIPファイルをダウンロードし、</body>タグの直前でminified/配下にあるgsap.min.jsを読み込みます。
コード
<script src=“js/three.min.js”></script>
<script src="js/gsap.min.js"></script>
npmからインストールしてくる場合は、以下のコマンドをターミナルで実行してください。
コマンド(npm)
# Three.js
npm i three

# GSAP
npm i gsap
手順2
まず最初にHTMLです。HTMLは至ってシンプルで、以下の1行をHTMLに記述するだけです。このcanvasタグの中に、今回Three.jsで作成したものを表示します。CSSは特に必要ありません。
<canvas id="webgl-canvas"></canvas>
手順3
次にJavaScriptです。JavaScriptではそれぞれ役割別に、StageとMeshという2つのクラスを作成します。まず最初にStageクラスです。このStageクラスでは、WebGLをレンダリングするためのレンダラーや3Dオブジェクトを表示するためのシーン、3D空間を見る視点になるカメラ等を作成していきます。
class Stage {
  constructor() {
    this.renderParam = {
      width: window.innerWidth,
      height: window.innerHeight
    };

    this.cameraParam = {
      fov: 45,
      near: 1,
      far: 20,
      lookAt: new THREE.Vector3(0, 0, 0),
      x: 0,
      y: 0,
      z: 5
    };

    this.scene = null;
    this.camera = null;
    this.renderer = null;
    this.isInitialized = false;
  }

  // 初期化
  init() {
    this._setScene();
    this._setRender();
    this._setCamera();

    this.isInitialized = true;
  }

  // シーンの作成
  _setScene() {
    this.scene = new THREE.Scene();
  }

  // レンダラーの作成
  _setRender() {
    this.renderer = new THREE.WebGLRenderer({
      canvas: document.getElementById('webgl-canvas')
    });
    this.renderer.setPixelRatio(window.devicePixelRatio);
    this.renderer.setClearColor(new THREE.Color(this.renderParam.clearColor));
    this.renderer.setSize(this.renderParam.width, this.renderParam.height);
  }

  // カメラの作成
  _setCamera() {
    const windowWidth = window.innerWidth;
    const windowHeight = window.innerHeight;

    if (!this.isInitialized) {
      this.camera = new THREE.PerspectiveCamera(
        this.cameraParam.fov,
        windowWidth / windowHeight,
        this.cameraParam.near,
        this.cameraParam.far
      );

      this.camera.position.set(
        this.cameraParam.x,
        this.cameraParam.y,
        this.cameraParam.z
      );
    }

    this.camera.aspect = windowWidth / windowHeight;
    this.camera.updateProjectionMatrix();
    this.renderer.setPixelRatio(window.devicePixelRatio);
    this.renderer.setSize(windowWidth, windowHeight);
  }

  // ライト
  _setLight() {
    const directionalLight = new THREE.DirectionalLight(0xFFFFFF, 1);
    const ambientLight = new THREE.AmbientLight(0xFFFFFF, 0.5);
    directionalLight.position.set(1, 1, 1);
    this.scene.add(directionalLight);
    this.scene.add(ambientLight);
  }

  // レンダリング
  _render() {
    this.renderer.render(this.scene, this.camera);
  }

  // リサイズイベント
  onResize() {
    this._setCamera();
  }

  // requestAnimationFrame
  onRaf() {
    this._render();
  }
}
手順4
続いてMeshクラスです。このMeshクラスでは、ジオメトリ(形状)とマテリアル(表面の質感)からメッシュを作成します。また、Stageクラス同様にレンダリング、リサイズイベント、アニメーションの処理も記述しています。
モーフィングについては、_setMesh内でcreateGeometryというジオメトリを作成する関数を作り、その中でモーフィングしたい属性の作成(配列)、それぞれの形状の頂点属性の作成(配列)、モーフターゲットにそれぞれの形状の頂点属性の追加を行っています。
class Mesh {
  constructor(stage) {
    this.stage = stage;

    this.geometryParam = {
      width: 2,
      height: 2,
      depth: 2,
      widthSegments: 256,
      heightSegments: 256,
      depthSegments: 256
    }

    this.params = {
      bloomThreshold: 0.0,
      bloomStrength: 0.0,
      bloomRadius: 0.0
    };

    this.animationParam = {
      value01: 0,
      value02: 0,
      value03: 0
    }

    this.aspect = {
      width: window.innerWidth,
      height: window.innerHeight
    }
  }

  // 初期化
  init() {
    this._setMesh();
  }

  // メッシュの作成
  _setMesh() {
    const createGeometry = () => {
      const geometry = new THREE.BoxGeometry(
        this.geometryParam.width,
        this.geometryParam.height,
        this.geometryParam.depth,
        this.geometryParam.widthSegments,
        this.geometryParam.heightSegments,
        this.geometryParam.depthSegments
      );

      // モーフィングしたい属性を格納する空の配列を作成する。(今回はposition)
      geometry.morphAttributes.position = [];

      // geometryの元のposition(頂点)
      const positionAttribute = geometry.attributes.position;
      // 最初のモーフターゲットとして、立方体の頂点をgraykleinになるように変化させる用の配列を作成する。
      const graykleinPositions = [];
      // 2つ目のモーフターゲットとして、graykleinの頂点を球体になるように変化させる用の配列を作成する。
      const spherePositions = [];
      // 3つ目のモーフターゲットとして、球体の頂点をねじれになるように変化させる用の配列を作成する。
      const twistPositions = [];

      const direction = new THREE.Vector3(1, 0, 0);
      const vertex = new THREE.Vector3();

      for (let i = 0; i < positionAttribute.count; i++) {
        let x = positionAttribute.getX(i);
        let y = positionAttribute.getY(i);
        let z = positionAttribute.getZ(i);
        const a = 3.0;
        const n = 3.0;
        const m = 1.0;
        let u = x * 4.0 * Math.PI;
        let v = y * 2.0 * Math.PI;

        // graykleinを生成する。
        graykleinPositions.push(
          x = 0.4 * (a + Math.cos(n * u / 2.0) * Math.sin(v) - Math.sin(n * u / 2.0) * Math.sin(2.0 * v)) * Math.cos(m * u / 2.0),
          y = 0.4 * (a + Math.cos(n * u / 2.0) * Math.sin(v) - Math.sin(n * u / 2.0) * Math.sin(2.0 * v)) * Math.sin(m * u / 2.0),
          z = 0.4 * Math.sin(n * u / 2.0) * Math.sin(v) + Math.cos(n * u / 2.0) * Math.sin(2.0 * v)
        );

        // ねじれを生成する。
        vertex.set(x * 1.5, y / 1.5, z);
        vertex.applyAxisAngle(direction, Math.PI * x / 2).toArray(twistPositions, twistPositions.length);

        u = -x * 2.0 * Math.PI;
        v = y * Math.PI;

        // 球体を生成する。
        spherePositions.push(
          x = 1.5 * Math.sin(u) * Math.sin(v),
          y = 1.5 * Math.cos(u) * Math.sin(v),
          z = 1.5 * Math.cos(v)
        );
      }

      // graykleinの位置を1つ目のモーフターゲットとして追加する。
      geometry.morphAttributes.position[0] = new THREE.Float32BufferAttribute(graykleinPositions, 3);
      // 球体の位置を2つ目のモーフターゲットとして追加する。
      geometry.morphAttributes.position[1] = new THREE.Float32BufferAttribute(spherePositions, 3);
      // ねじれの位置を3つ目のモーフターゲットとして追加する。
      geometry.morphAttributes.position[2] = new THREE.Float32BufferAttribute(twistPositions, 3);

      return geometry;
    }

    const geometry = createGeometry();
    const material = new THREE.MeshPhongMaterial({
      color: 0x46E678,
      flatShading: true
    });

    this.mesh = new THREE.Mesh(geometry, material);
    this.stage.scene.add(this.mesh);
  }

  // レンダリング
  _render() {
    this.mesh.rotation.x += 0.01;
    this.mesh.rotation.y += 0.01;
    this.mesh.morphTargetInfluences[0] = this.animationParam.value01;
    this.mesh.morphTargetInfluences[1] = this.animationParam.value02;
    this.mesh.morphTargetInfluences[2] = this.animationParam.value03;
  }

  // モーフィングアニメーション
  animate() {
    const tl = gsap.timeline({
      defaults: {duration: 4, ease: 'Power4.easeInOut'},
      repeat: -1,
      yoyo: true,
    });
    tl.to(this.animationParam, {
      value01: 0,
      value02: 0,
      value03: 0,
      duration: 0
    }).to(this.animationParam, {
      value01: 1,
      value02: 0,
      value03: 0
    }).to(this.animationParam, {
      value01: 0,
      value02: 1,
      value03: 0
    }).to(this.animationParam, {
      value01: 0,
      value02: 0,
      value03: 1
    });
  }

  // requestAnimationFrame
  onRaf() {
    this._render();
  }
}
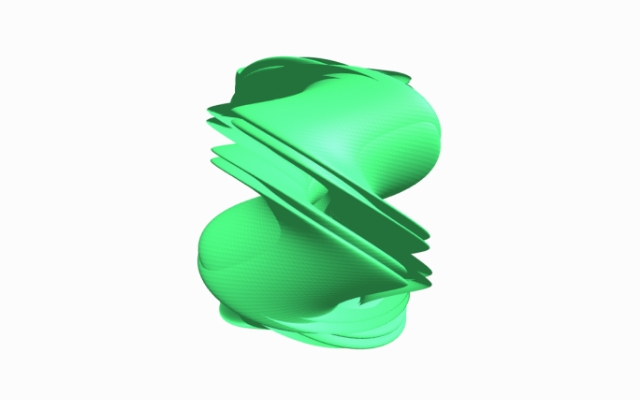
サンプル
Three.jsを使ったモーフィングのサンプルです。gsap.timelineで設定しているdurationの値(今回は4秒)が経過すると、次の形に変形していきます。変形と一緒に、メッシュのx軸・y軸それぞれに回転も加えています。